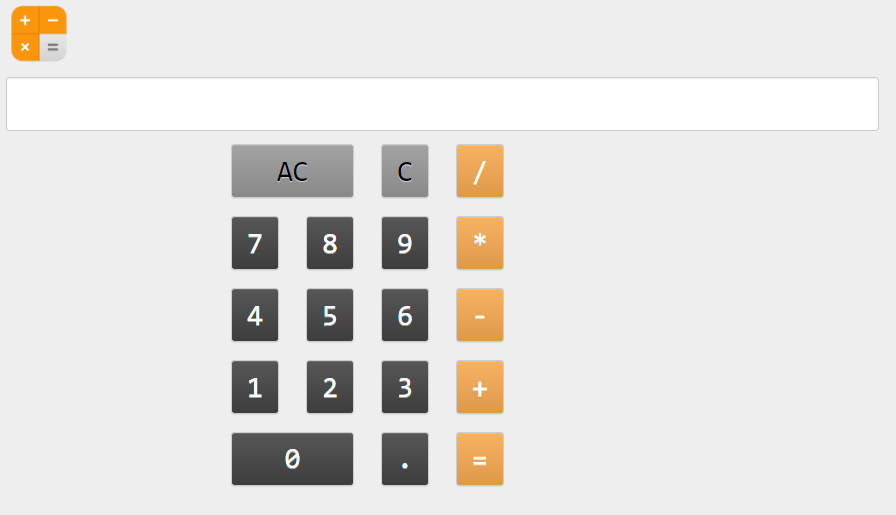
2. iPhone Calculator

This builds a simple calculator using code to add the buttons.
It is based on, with slight variations to suit, the the iphone calculator with a grid of 5 rows and 4 columns.
../_images/calculator.png

2.1. References

  1. Youtube guide for using code to create the components: https://www.youtube.com/watch?v=NiQdsK3H57Y

  2. Anvil events: https://anvil.works/docs/client/components

  3. Python try-except: https://www.w3schools.com/python/python_try_except.asp

  4. Python eval: https://www.w3schools.com/python/ref_func_eval.asp

  5. Python enumerate: https://www.w3schools.com/python/ref_func_enumerate.asp

  6. Colour hex values: https://www.w3schools.com/colors/colors_picker.asp?colorhex=85b185

  7. Calculator icon: https://icons.iconarchive.com/icons/tristan-edwards/sevenesque/256/Calculator-icon.png

  8. Grid panel syntax: https://anvil.works/docs/api/anvil#GridPanel

  9. Button syntax: https://anvil.works/docs/api/anvil#Button

../_images/Calculator-icon.png

2.2. Get started

  1. Go to: https://anvil.works/new-build

  2. Click: Blank App.

  3. Choose: Custom HTML

  4. Choose: Blank Panel


2.3. Settings

  1. Click on the cog icon to show the settings tab.

  2. Enter an App name. iPhone_Calculator

  3. Enter an App title. iPhone_Calculator

  4. Enter an App description. iPhone_Calculator using code to build the buttons

  5. Get a calculator icon to upload such as: https://icons.iconarchive.com/icons/tristan-edwards/sevenesque/256/Calculator-icon.png

  6. Click Change Image to upload an App logo.

  7. Close the settings tab.


2.4. Build first part of interface

  1. Drag and drop the image component from the right toolbox onto Form1.

  2. In the properties panel: height section, set the height to 75.

  3. Drag and drop the textbox component from the right toolbox onto Form1 below the image.

  4. In the properties panel: text section, set the align to left, the font to Consolas and the font_size to 32.

  5. Click below on the form itself.

  6. In the properties panel: appearance section, set the background to grey: #eee.

../_images/Calculator_interface1.png

2.5. Add code for buttons

Add a chars list that has the button text to be shown.
Use whitespace to layout the list as it will appear so it will be easier to work out the rows needed later in the code.
class Form1(Form1Template):
def __init__(self, **properties):
    # Set Form properties and Data Bindings.
    self.init_components(**properties)

    # Any code you write here will run when the form opens.
    # add btn text list
    chars = ["AC", "C", "/",
            "7", "8", "9", "*",
            "4", "5", "6", "-",
            "1", "2", "3", "+",
            "0",".", "="]

2.6. Code for buttons step 1

Add code to the end of the init method to create buttons.
The grid panel has rows specified by letters: A, B, C…
The grid panel has 12 columns specified by numbers: 0, 1, 2, ….11
Use self.btn = {} to set up the button dictionary which will store each button object with the button text as the key.
Use gp = GridPanel() to set up an empty Grid panel to which the buttons will be added.
Use enumerate(chars) to turn the list into a dictionary like object where each button has a key starting from 0, and the button text is the dictionary value.
Loop through the enumerate object using: for idx,i in enumerate(chars):, where idx is the key and i is the button text.
Set some default values for the button variables to be adjusted later: row, background colour bgcol, foreground colour fgcol, and button width bthwidth.
Create each button self.btn[i]. The self prefix is required since this is an object in a class, Form1.
Add each button to the Grid panel using: gp.add_component().
Add the Grid panel to the form using self.add_component(gp).
Add a spacer at the bottom of the form to fill the screen.
Specify the spacer height first using self.space = Spacer(height=500).
Then add it to the form using self.add_component(self.space).
self.btn = {}
gp = GridPanel()

for idx,i in enumerate(chars):

    #temporary values to be replaced with button specific values
    row = 'A'
    bgcol = "#999999"
    fgcol = "#000000"
    btnwidth = 1

    #create btns
    self.btn[i] = Button(align="full", text=i, font="Consolas", font_size=32, bold=False, foreground=fgcol,background=bgcol)
    gp.add_component(self.btn[i], row=row, col_xs=3, width_xs=btnwidth)

    # display grid panel
    self.add_component(gp)
    # add a spacer after grid panle to fill the bottom of the screen
    self.space = Spacer(height=500)
    self.add_component(self.space)

2.7. Code for buttons step 2

Replace the default value for the button row based on the enumerate index, idx.
The chars list has been set out as it will appear on screen, with 3, 4, 4, 4, 3 butotns per row.
Thesse values are ued to create the if, elif, else block in which the rows are specified from A to E.
# enumerate buttons
for idx,i in enumerate(chars):

    #btn row
    if idx < 3:
        row = 'A'
    elif 3 <= idx < 7:
        row = 'B'
    elif 7 <= idx < 11:
        row = 'C'
    elif 11 <= idx < 15:
        row = 'D'
    else:
        row = 'E'

2.8. Code for buttons step 3

Replace the default values for the button colours with those
based on the text value, i in enumerate(chars).
# enumerate buttons
for idx,i in enumerate(chars):

    #btn colour
    if i in ["AC", "C"]:
        bgcol = "#999999"
        fgcol = "#000000"
    elif i in ["=", "+", "-", "*", "/"]:
        bgcol = "#f6aa51"
        fgcol = "#FFFFFF"
    else:
        bgcol = "#444444"
        fgcol = "#FFFFFF"

2.9. Code for buttons step 4

Replace the default values for the button width with those based on the text value, i enumerate(chars).
The width value is the number of columns for the button to be spread out across.
All the buttons are to take up only 1 column, except for the AC and 0 buttons which will take up 2 columns.
# enumerate buttons
for idx,i in enumerate(chars):

    #btn width
    if i in ["AC", "0"]:
        btnwidth = 2
    else:
        btnwidth = 1

2.10. Code for buttons click method

Define a click method to determine what happens to the calculator text box.
Use the aguments be: (self, **event_args).
event_args has an index ['sender'] from which the button text can be found using the tab.name property, which is set when the button was created.
The tag.name property will be set to the text of the button in code to be added later in step 5 below.
Get the button text using: val = event_args['sender'].tag.name
To add the button text to the end of the text box use: self.text_box_1.text += val.
If the AC button, all clear, is pressed, clear the text box with: self.text_box_1.text = "".
If the C button, clear last entry, is pressed, clear the last character of the text box with: self.text_box_1.text = self.text_box_1.text[:-1].
When the = button is pressed, use the eval function to convert the expression in the text box to a value.
This needs to be placed in a try except block to handle cases in which the maths string can’t be evaluated. e.g “4+/*3”
# click method for btns
def click(self, **event_args):
    val = event_args['sender'].tag.name
    if val == "=":
        try:
            self.text_box_1.text = eval(self.text_box_1.text)
        except:
            self.text_box_1.text  += " error"
    elif val == "AC":
        self.text_box_1.text = ""
    elif val == "C":
        self.text_box_1.text = self.text_box_1.text[:-1]
    else:
        self.text_box_1.text += val

2.11. Code for buttons step 5

Now that the button click method has been coded, each button needs to have the event handler added to their properties.
Set the button tag.name property to the button text using: self.btn[i].tag.name = i.
Add the click event to the button properties using: self.btn[i].set_event_handler('click', self.click)
#create btns
self.btn[i] = Button(align="full", text=i, font="Consolas", font_size=32, bold=False, foreground=fgcol,background=bgcol)
# to collect the tag name when clicked
self.btn[i].tag.name = i
# handle the click event and attach the click method to the event
self.btn[i].set_event_handler('click', self.click)
gp.add_component(self.btn[i], row=row, col_xs=3, width_xs=btnwidth)

2.12. Final code

class Form1(Form1Template):
    def __init__(self, **properties):
        # Set Form properties and Data Bindings.
        self.init_components(**properties)

        # Any code you write here will run when the form opens.
        # add btn text list
        chars = ["AC", "C", "/",
                "7", "8", "9", "*",
                "4", "5", "6", "-",
                "1", "2", "3", "+",
                "0",".", "="]

        self.btn = {}
        gp = GridPanel()

        # enumerate buttons
        for idx,i in enumerate(chars):
            #btn row
            if idx < 3:
                row = 'A'
            elif 3 <= idx < 7:
                row = 'B'
            elif 7 <= idx < 11:
                row = 'C'
            elif 11 <= idx < 15:
                row = 'D'
            else:
                row = 'E'

            #btn colour
            if i in ["AC", "C"]:
                bgcol = "#999999"
                fgcol = "#000000"
            elif i in ["=", "+", "-", "*", "/"]:
                bgcol = "#f6aa51"
                fgcol = "#FFFFFF"
            else:
                bgcol = "#444444"
                fgcol = "#FFFFFF"

            #btn width
            if i in ["AC", "0"]:
                btnwidth = 2
            else:
                btnwidth = 1

            #create btns
            self.btn[i] = Button(align="full", text=i, font="Consolas", font_size=32, bold=False, foreground=fgcol,background=bgcol)
            # to collect the tag name when clicked
            self.btn[i].tag.name = i
            # handle the click event and attach the click method to the event
            self.btn[i].set_event_handler('click', self.click)
            gp.add_component(self.btn[i], row=row, col_xs=3, width_xs=btnwidth)

            # display grid panel
            self.add_component(gp)
            # add a spacer after grid panle to fill the bottom of the screen
            self.space = Spacer(height=500)
            self.add_component(self.space)

    # click method for btns
    def click(self, **event_args):
        val = event_args['sender'].tag.name
        if val == "=":
            try:
                self.text_box_1.text = eval(self.text_box_1.text)
            except:
                self.text_box_1.text  += " error"
        elif val == "AC":
            self.text_box_1.text = ""
        elif val == "C":
            self.text_box_1.text = self.text_box_1.text[:-1]
        else:
            self.text_box_1.text += val

Tasks

  1. The keyboard can also be used instead of the buttons. Try it out.

  2. Try adding some maths function buttons in another row. e.g. x^2 which squares the text box. e.g. sqrt which takes the square root.

  3. Try adding some maths function buttons in another row by importing the maths library. See: https://docs.python.org/3/library/math.html