11. Entry Validation for numbers
11.1. Usage
- entry_widget = tk.Entry(parent, option=value)
- parent is the window or frame object.Options can be passed as parameters separated by commas.
11.2. Using a variable for the text of an entry widget
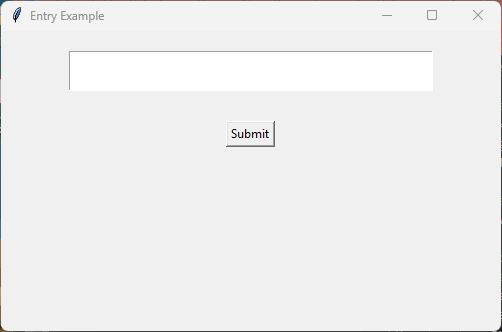
This code creates a simple Tkinter GUI application that allows a user to enter their name into an entry field and display the entered name in a label when a button is clicked. Here's a breakdown of its functionality:
Main Window Setup: Initializes the main window with a specified size and title.
Entry Widget: Provides a text entry field where the user can input their name.
StringVar: Associates the entry field with a StringVar, name_var, to manage the input text.
Button: When clicked, triggers a function to retrieve the text from name_var and sets the
textvalue of the label widget.Label: Displays the retrieved text in a label, formatted to show on two lines.
name_var = tk.StringVar() creates a Tkinter variable of type StringVar. This variable is used to dynamically update and retrieve the value of a string associated with the Entry widget.
get_name() is a function that retrieves the current value of name_var using name_var.get()
tk.Entry(root, textvariable=name_var, font=('calibre', 24, 'normal'), width=20) creates an entry widget for text input.
textvariable=name_var links the entry widget to the name_var StringVar, so any text entered in the widget updates name_var and vice versa.
tk.Button(root, text="Submit", command=get_name) creates a button that, when clicked, calls the get_name function.
import tkinter as tk

# Create the main window
root = tk.Tk()
root.geometry("500x300")  # Set window size
root.title("Entry Example")  # Set window title

# Create a StringVar to associate with the entry
name_var = tk.StringVar()

# Function to get the value from the entry field and display it in the label
def get_name():
    name = name_var.get()
    output_label.config(text=f"Name entered:\n{name}")

# Create the entry widget for input
name_entry = tk.Entry(root, textvariable=name_var, font=('calibre', 24, 'normal'), width=20)
name_entry.pack(pady=20)  # Add some padding to the top

# Create a button to trigger the get_name function
submit_button = tk.Button(root, text="Submit", command=get_name)
submit_button.pack(pady=10)

# Create a label to display the output
output_label = tk.Label(root, text="", font=('calibre', 24, 'normal'), width=30, height=2)
output_label.pack(pady=20)

# Run the main event loop
root.mainloop()
11.3. Validation via the validate option
The validate option in Tkinter is used to control when validation should occur for an entry widget. It works in conjunction with the validatecommand option, which specifies the function to call for validation.
The validate option determines the conditions under which the validation function is called. It can take the following values:
'focus': Validation occurs when the entry widget gains or loses focus.
'focusin': Validation occurs when the entry widget gains focus.
'focusout': Validation occurs when the entry widget loses focus.
'key': Validation occurs whenever the user types something in the entry widget.
'all': Validation occurs under all the above conditions.
'none': No validation occurs (default).
The validatecommand option specifies the function to call for validation. This function should return True if the input is valid and False otherwise. The function can take various substitution codes as arguments, such as:
%d : Action code. It indicates the type of action that triggered the validation. Possible values are: 1 for an insertion; 0 for a deletion; -1 for any other action.
%i : Index of the character string to be inserted/deleted, or -1 if not applicable.
%P : The value of the entry if the edit is allowed. This is the new value of the widget's text.
%s : The current value of the entry before the edit.
%S : The text string being inserted or deleted, if any.
%v : The type of validation currently set; the current value of the validate option. This can be: none, focus, focusin, focusout, key
%V : The type of event that triggered the validation; the current value of the validatecommand option. This can be: key, focusin, focusout, forced
%W : The name of the widget triggering the callback.
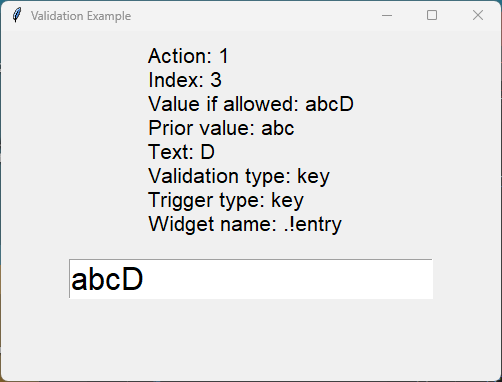
import tkinter as tk


def on_validate(action, index, value_if_allowed, prior_value, text, validation_type, trigger_type, widget_name):
    output_text.set(
        f"Action: {action}\n"
        f"Index: {index}\n"
        f"Value if allowed: {value_if_allowed}\n"
        f"Prior value: {prior_value}\n"
        f"Text: {text}\n"
        f"Validation type: {validation_type}\n"
        f"Trigger type: {trigger_type}\n"
        f"Widget name: {widget_name}"
    )
    return True


root = tk.Tk()
root.title("Validation Example")
root.geometry("500x350")

output_text = tk.StringVar()
output_label = tk.Label(root, font=("Arial",16), textvariable=output_text, justify="left")
output_label.pack(pady=10)

entry_var = tk.StringVar()
entry_field = tk.Entry(root, font=("Arial",24), textvariable=entry_var, validate="key", validatecommand=(root.register(on_validate), "%d", "%i", "%P", "%s", "%S", "%v", "%V", "%W"))
entry_field.pack(pady=10)


root.mainloop()
11.3.1. Numeric validation
import tkinter as tk

def validate_input(new_value):
    # Check if the new value is numeric
    return new_value.isdigit() or new_value == ""

root = tk.Tk()
root.title("Validate Entry Example")
root.geometry("500x300")  # Set window size

# Register the validation function
vcmd = (root.register(validate_input), '%P')

entry = tk.Entry(root, font=("Arial", 24), validate='key', validatecommand=vcmd)
entry.pack(pady=10)

root.mainloop()
Tasks
Modify the code above to validate for an age from 0 to 120.
Modify the code above to validate for an age from 0 to 120.
import tkinter as tk


def validate_age(new_value):
    if new_value.isdigit():
        age = int(new_value)
        return 0 <= age <= 120  # Returns True if within range, otherwise False
    else:
        return new_value == ""  # Returns True if empty, otherwise False


root = tk.Tk()
root.title("Age Validation Example")
root.geometry("500x300")  # Set window size

# Register the validation function
vcmd = (root.register(validate_age), "%P")

entry = tk.Entry(root, font=("Arial", 24), validate="key", validatecommand=vcmd)
entry.pack(pady=10)

root.mainloop()
11.3.2. Phone number validation
import tkinter as tk

def validate_phone(new_value):
    # Check if the new value is numeric and has at most 10 digits
    return new_value.isdigit() and len(new_value) <= 10

root = tk.Tk()
root.title("Phone Number Validation Example")
root.geometry("500x300")  # Set window size

# Register the validation function
vcmd = (root.register(validate_phone), '%P')

entry = tk.Entry(root, font=("Arial", 24), validate='key', validatecommand=vcmd)
entry.pack(pady=10)

root.mainloop()
Tasks
Modify the code above to validate for a mobile phone number that requires a space after 4 digits and again after another 3 digits.
Modify the code above to validate for a mobile phone number that requires a space after 4 digits and again after another 3 digits.
import tkinter as tk


def validate_phone(new_value):
    # Check if the new value follows the pattern: 4 digits, a space, 3 digits, a space, 3 digits
    if len(new_value) == 0:
        return True
    if len(new_value) in [5, 9]:
        return new_value[-1] == ' '  # Ensure the 5th and 9th characters are spaces
    if len(new_value) in [1, 2, 3, 4, 6, 7, 8, 10, 11, 12]:
        return new_value[-1].isdigit()  # Ensure other positions are digits
    return False

root = tk.Tk()
root.title("Phone Number Validation Example")
root.geometry("500x300")  # Set window size

# Register the validation function
vcmd = (root.register(validate_phone), '%P')

entry = tk.Entry(root, validate='key', validatecommand=vcmd, font=("Arial",20))
entry.pack(pady=10)

root.mainloop()
11.4. Email validation
import tkinter as tk
import re

def validate_email(new_value):
    # Define the regex pattern for a valid email address
    pattern = r'^[a-zA-Z0-9_.+-]+@[a-zA-Z0-9-]+\.[a-zA-Z0-9-.]+$'
    return re.match(pattern, new_value) is not None or new_value == ""

root = tk.Tk()
root.title("Email Validation Example")

# Register the validation function
vcmd = (root.register(validate_email), '%P')

entry = tk.Entry(root, validate='key', validatecommand=vcmd)
entry.pack(pady=10)

root.mainloop()