1. tk geometry pack
1.1. pack
The widget's requested size based on its content.
The use of side options (left, right, top, bottom) which places widgets in a “strip” along one side.
The use of expand to increase the allocated area.
The use of fill to specify how the widget should fill the allocated area.
- widget.pack()
- Use pack() method to pack a widgets vertically from top to bottom.e.g. widget.pack()
1.2. Options for the pack() geometry manager
1.2.1. Side
- widget.pack(side=side_string)
- The side_string option determines the position of the widget within its parent container.It can take values like left, right, top, or bottom.e.g. widget.pack(side="left")The side option specifies which side of the parent widget the child widget should be packed against.e.g. Packing on the left creates a vertical strip along the left edge of the window.

import tkinter as tk

root = tk.Tk()
root.title("pack side")
root.geometry("250x150")

button1 = tk.Button(text="1 Top", bg="lightgreen")
button1.pack(side="top")

button2 = tk.Button(text="2 Bottom", bg="khaki")
button2.pack(side="bottom")

button3 = tk.Button(text="3 Left", bg="lightblue")
button3.pack(side="left")

button4 = tk.Button(text="4 Right", bg="lightcoral")
button4.pack(side="right")

root.mainloop()
Tasks
Change the example above to pack the top and bottom buttons at the top and the left and right buttons at the left.
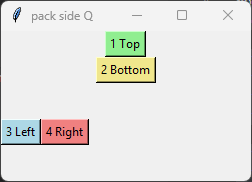
Change the example above to pack the top and bottom buttons at the top and the left and right buttons at the left.
import tkinter as tk

root = tk.Tk()
root.title("pack side Q")
root.geometry("250x150")

button1 = tk.Button(text="1 Top", bg="lightgreen")
button2 = tk.Button(text="2 Bottom", bg="khaki")
button3 = tk.Button(text="3 Left", bg="lightblue")
button4 = tk.Button(text="4 Right", bg="lightcoral")

button1.pack(side="top")
button2.pack(side="top")
button3.pack(side="left")
button4.pack(side="left")

root.mainloop()
1.2.2. Expand
- widget.pack(expand=boolean)
- The boolean value is True or False.e.g. widget.pack(expand=True) to make a widget expand when the frame is resizedThe expand option allows a widget to expand if the user resizes the frame.
1.2.3. Fill
- widget.pack(fill=fill_string)
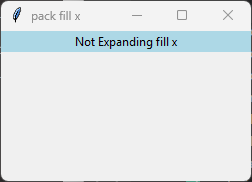
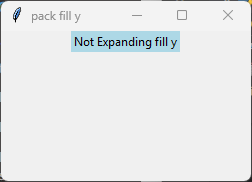
- The fill_string value is None, x, y, or both.The fill option specifies how the widget should fill the available space.fill='x' works, because pack always gives the widget the full width of its container.fill='y' does not appear to work with expand=False, because the label receives only its natural height. There is no extra vertical space to fill. Vertical fill does work when expand=True.fill='both' behaves the same way: horizontal fill works, vertical fill does not unless expand=True.
1.2.3.1. expand=False, fill='x'
Examples below use expand=False.
import tkinter as tk

root = tk.Tk()
root.title("pack fill x")
root.geometry("250x150")

label = tk.Label(root, text="Not Expanding fill x", bg="lightblue")
label.pack(expand=False, fill='x')

root.mainloop()
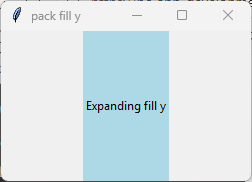
1.2.3.2. expand=False, fill='y'
import tkinter as tk

root = tk.Tk()
root.title("pack fill y")
root.geometry("250x150")

label = tk.Label(root, text="Not Expanding fill y", bg="lightblue")
label.pack(expand=False, fill='y')

root.mainloop()
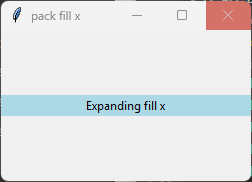
1.2.3.3. expand=True, fill='x'
Example: Use expand=True so fill options are visible for the y direction as well as the x direction.
import tkinter as tk

root = tk.Tk()
root.title("pack fill x")
root.geometry("250x150")

label = tk.Label(root, text="Expanding fill x", bg="lightblue")
label.pack(expand=True, fill='x')

root.mainloop()
1.2.3.4. expand=True, fill='y'
import tkinter as tk

root = tk.Tk()
root.title("pack fill y")
root.geometry("250x150")

label = tk.Label(root, text="Expanding fill y", bg="lightblue")
label.pack(expand=True, fill='y')

root.mainloop()
Tasks
Change the example above to pack the label widget as shown in the picture.
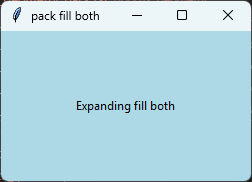
Change the example above to pack the label widget as shown in the picture.
import tkinter as tk

root = tk.Tk()
root.title("pack fill both expand")
root.geometry("250x150")

label = tk.Label(root, text="Expanding fill both", bg="lightblue")
label.pack(expand=True, fill='both')

root.mainloop()
1.2.4. Anchor
- widget.pack(anchor=anchor_string)
- anchor_string can take values "n", "s", "e", "w", "ne", "nw", "se", "sw", "center".eg. 'nw' (top-left), 'center', or 'se' (bottom-right)The anchor option specifies the position of the widget within its allocated space.Example: widget.pack(anchor='w') positions the widget at the left of its allocated space.
Example: In the example below, the allocated space is larger than the widget itself, being the full width of the window, so the anchor option controls where within that space the widget is placed.
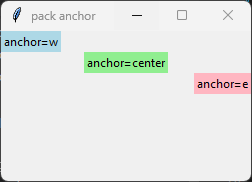
import tkinter as tk

root = tk.Tk()
root.title("pack anchor")
root.geometry('250x150')

label1 = tk.Label(root, text="anchor=w", bg="lightblue")
label1.pack(anchor='w')

label2 = tk.Label(root, text="anchor=center", bg="lightgreen")
label2.pack(anchor='center')

label3 = tk.Label(root, text="anchor=e", bg="lightpink")
label3.pack(anchor='e')

root.mainloop()
1.2.5. pack_propagate
- widget.pack_propagate(flag)
- flag is a boolean (True or False).Default is True.When True, the widget resizes itself to fit the size of its children.When False, the widget keeps its explicit width and height.Disabling propagation allows child widgets to be positioned within the widget's available space using options such as anchor, expand, and fill.Example: widget.pack_propagate(False) prevents the widget from shrinking to the size of its children.
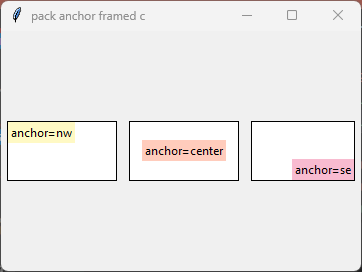
import tkinter as tk

root = tk.Tk()
root.title("pack anchor framed c")
root.geometry("360x240")


# anchor = nw
frame_nw = tk.Frame(root, width=110, height=60, bg="white", highlightbackground="black", highlightthickness=1)
frame_nw.pack(side="left", padx=6, pady=10)
frame_nw.pack_propagate(False)
label_nw = tk.Label(frame_nw, text="anchor=nw", bg="#fff9c4")
label_nw.pack(expand=True, anchor="nw")

# anchor = center
frame_c = tk.Frame(root, width=110, height=60, bg="white", highlightbackground="black", highlightthickness=1)
frame_c.pack(side="left", padx=6, pady=10)
frame_c.pack_propagate(False)
label_c = tk.Label(frame_c, text="anchor=center", bg="#ffccbc")
label_c.pack(expand=True, anchor="center")

# anchor = se
frame_se = tk.Frame(root, width=110, height=60, bg="white", highlightbackground="black", highlightthickness=1)
frame_se.pack(side="left", padx=6, pady=10)
frame_se.pack_propagate(False)
label_se = tk.Label(frame_se, text="anchor=se", bg="#f8bbd0")
label_se.pack(expand=True, anchor="se")


root.mainloop()
Tasks
Complete the code below by adding the anchor values to match the image shown.
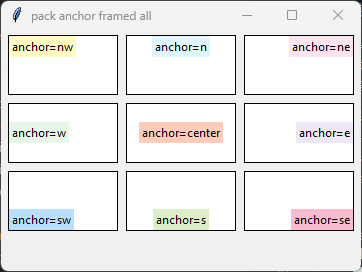
import tkinter as tk

root = tk.Tk()
root.title("pack anchor expand - 3x3 layout")
root.geometry("360x240")

# -------------------
# Row 1
# -------------------

row1 = tk.Frame(root)
row1.pack(side="top")
# anchor = nw
frame_nw = tk.Frame(row1, width=110, height=60, bg="white", highlightbackground="black", highlightthickness=1)
frame_nw.pack(side="left", padx=4, pady=4)
frame_nw.pack_propagate(False)
label_nw = tk.Label(frame_nw, text="anchor=nw", bg="#fff9c4")
label_nw.pack(expand=True, anchor="___")

# anchor = n
frame_n = tk.Frame(row1, width=110, height=60, bg="white", highlightbackground="black", highlightthickness=1)
frame_n.pack(side="left", padx=4, pady=4)
frame_n.pack_propagate(False)
label_n = tk.Label(frame_n, text="anchor=n", bg="#e1f5fe")
label_n.pack(expand=True, anchor="___")

# anchor = ne
frame_ne = tk.Frame(row1, width=110, height=60, bg="white", highlightbackground="black", highlightthickness=1)
frame_ne.pack(side="left", padx=4, pady=4)
frame_ne.pack_propagate(False)
label_ne = tk.Label(frame_ne, text="anchor=ne", bg="#fce4ec")
label_ne.pack(expand=True, anchor="___")

# -------------------
# Row 2
# -------------------

row2 = tk.Frame(root)
row2.pack(side="top")
# anchor = w
frame_w = tk.Frame(row2, width=110, height=60, bg="white", highlightbackground="black", highlightthickness=1)
frame_w.pack(side="left", padx=4, pady=4)
frame_w.pack_propagate(False)
label_w = tk.Label(frame_w, text="anchor=w", bg="#e8f5e9")
label_w.pack(expand=True, anchor="___")

# anchor = center
frame_c = tk.Frame(row2, width=110, height=60, bg="white", highlightbackground="black", highlightthickness=1)
frame_c.pack(side="left", padx=4, pady=4)
frame_c.pack_propagate(False)
label_c = tk.Label(frame_c, text="anchor=center", bg="#ffccbc")
label_c.pack(expand=True, anchor="___")

# anchor = e
frame_e = tk.Frame(row2, width=110, height=60, bg="white", highlightbackground="black", highlightthickness=1)
frame_e.pack(side="left", padx=4, pady=4)
frame_e.pack_propagate(False)
label_e = tk.Label(frame_e, text="anchor=e", bg="#ede7f6")
label_e.pack(expand=True, anchor="___")

# -------------------
# Row 3
# -------------------

row3 = tk.Frame(root)
row3.pack(side="top")
# anchor = sw
frame_sw = tk.Frame(row3, width=110, height=60, bg="white", highlightbackground="black", highlightthickness=1)
frame_sw.pack(side="left", padx=4, pady=4)
frame_sw.pack_propagate(False)
label_sw = tk.Label(frame_sw, text="anchor=sw", bg="#bbdefb")
label_sw.pack(expand=True, anchor="___")

# anchor = s
frame_s = tk.Frame(row3, width=110, height=60, bg="white", highlightbackground="black", highlightthickness=1)
frame_s.pack(side="left", padx=4, pady=4)
frame_s.pack_propagate(False)
label_s = tk.Label(frame_s, text="anchor=s", bg="#dcedc8")
label_s.pack(expand=True, anchor="___
# anchor = se
frame_se = tk.Frame(row3, width=110, height=60, bg="white", highlightbackground="black", highlightthickness=1)
frame_se.pack(side="left", padx=4, pady=4)
frame_se.pack_propagate(False)
label_se = tk.Label(frame_se, text="anchor=se", bg="#f8bbd0")
label_se.pack(expand=True, anchor="___")

root.mainloop()
Complete the code below by adding the anchor values to match the image shown.
import tkinter as tk

root = tk.Tk()
root.title("pack anchor expand - 3x3 layout")
root.geometry("360x240")

# -------------------
# Row 1
# -------------------

row1 = tk.Frame(root)
row1.pack(side="top")
# anchor = nw
frame_nw = tk.Frame(row1, width=110, height=60, bg="white", highlightbackground="black", highlightthickness=1)
frame_nw.pack(side="left", padx=4, pady=4)
frame_nw.pack_propagate(False)
label_nw = tk.Label(frame_nw, text="anchor=nw", bg="#fff9c4")
label_nw.pack(expand=True, anchor="nw")

# anchor = n
frame_n = tk.Frame(row1, width=110, height=60, bg="white", highlightbackground="black", highlightthickness=1)
frame_n.pack(side="left", padx=4, pady=4)
frame_n.pack_propagate(False)
label_n = tk.Label(frame_n, text="anchor=n", bg="#e1f5fe")
label_n.pack(expand=True, anchor="n")

# anchor = ne
frame_ne = tk.Frame(row1, width=110, height=60, bg="white", highlightbackground="black", highlightthickness=1)
frame_ne.pack(side="left", padx=4, pady=4)
frame_ne.pack_propagate(False)
label_ne = tk.Label(frame_ne, text="anchor=ne", bg="#fce4ec")
label_ne.pack(expand=True, anchor="ne")

# -------------------
# Row 2
# -------------------

row2 = tk.Frame(root)
row2.pack(side="top")
# anchor = w
frame_w = tk.Frame(row2, width=110, height=60, bg="white", highlightbackground="black", highlightthickness=1)
frame_w.pack(side="left", padx=4, pady=4)
frame_w.pack_propagate(False)
label_w = tk.Label(frame_w, text="anchor=w", bg="#e8f5e9")
label_w.pack(expand=True, anchor="w")

# anchor = center
frame_c = tk.Frame(row2, width=110, height=60, bg="white", highlightbackground="black", highlightthickness=1)
frame_c.pack(side="left", padx=4, pady=4)
frame_c.pack_propagate(False)
label_c = tk.Label(frame_c, text="anchor=center", bg="#ffccbc")
label_c.pack(expand=True, anchor="center")

# anchor = e
frame_e = tk.Frame(row2, width=110, height=60, bg="white", highlightbackground="black", highlightthickness=1)
frame_e.pack(side="left", padx=4, pady=4)
frame_e.pack_propagate(False)
label_e = tk.Label(frame_e, text="anchor=e", bg="#ede7f6")
label_e.pack(expand=True, anchor="e")

# -------------------
# Row 3
# -------------------

row3 = tk.Frame(root)
row3.pack(side="top")
# anchor = sw
frame_sw = tk.Frame(row3, width=110, height=60, bg="white", highlightbackground="black", highlightthickness=1)
frame_sw.pack(side="left", padx=4, pady=4)
frame_sw.pack_propagate(False)
label_sw = tk.Label(frame_sw, text="anchor=sw", bg="#bbdefb")
label_sw.pack(expand=True, anchor="sw")

# anchor = s
frame_s = tk.Frame(row3, width=110, height=60, bg="white", highlightbackground="black", highlightthickness=1)
frame_s.pack(side="left", padx=4, pady=4)
frame_s.pack_propagate(False)
label_s = tk.Label(frame_s, text="anchor=s", bg="#dcedc8")
label_s.pack(expand=True, anchor="s")

# anchor = se
frame_se = tk.Frame(row3, width=110, height=60, bg="white", highlightbackground="black", highlightthickness=1)
frame_se.pack(side="left", padx=4, pady=4)
frame_se.pack_propagate(False)
label_se = tk.Label(frame_se, text="anchor=se", bg="#f8bbd0")
label_se.pack(expand=True, anchor="se")

root.mainloop()
1.2.6. padding: internal
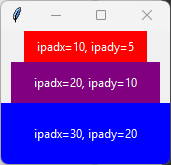
- widget.pack(ipadx=x, ipady=y)
- The ipadx value is an integer, x. The ipady value is an integer, y.These options control the internal padding (in pixels) along the x and y axes, respectively.Example: widget.pack(ipadx=10) has internal padding of 10 in the x direction on each side of the widget.
import tkinter as tk

root = tk.Tk()

label1 = tk.Label(root, text="ipadx=10, ipady=5", bg="red", fg="white")
label1.pack(ipadx=10, ipady=5)
label2 = tk.Label(root, text="ipadx=20, ipady=10", bg="purple", fg="white")
label2.pack(ipadx=20, ipady=10)
label3 = tk.Label(root, text="ipadx=30, ipady=20", bg="blue", fg="white")
label3.pack(ipadx=30, ipady=20)

root.mainloop()
1.2.7. padding: external
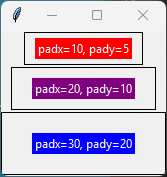
- widget.pack(padx=x, pady=y)
- The padx value is an integer, x. The pady value is an integer, y.These options control the external padding (in pixels) along the x and y axes, respectively.Example: widget.pack(padx=10) has external padding of 10 in the x direction on each side of the widget.
import tkinter as tk

root = tk.Tk()

# --- Block 1 ---
frame1 = tk.Frame(root, bd=1, relief="solid")
frame1.pack(pady=1)

label1 = tk.Label(frame1, text="padx=10, pady=5", bg="red", fg="white")
label1.pack(padx=10, pady=5)

# --- Block 2 ---
frame2 = tk.Frame(root, bd=1, relief="solid")
frame2.pack(pady=1)

label2 = tk.Label(frame2, text="padx=20, pady=10", bg="purple", fg="white")
label2.pack(padx=20, pady=10)

# --- Block 3 ---
frame3 = tk.Frame(root, bd=1, relief="solid")
frame3.pack(pady=1)

label3 = tk.Label(frame3, text="padx=30, pady=20", bg="blue", fg="white")
label3.pack(padx=30, pady=20)

root.mainloop()
Tasks
Examine the image and determine the padding applied ot buttons 4, 6, 8.
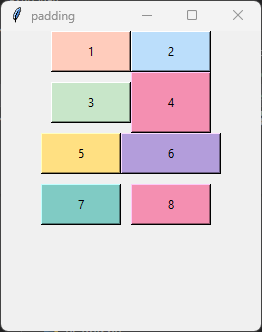
Examine the image and determine the padding applied to buttons 4, 6, 8.
Button 4: ipady=10
Button 6: ipadx=10
Button 8: padx=10, pady=10