8. Login form
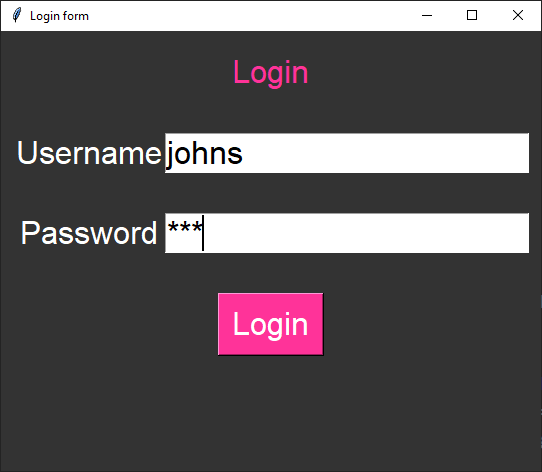
This code outputs a message box in response to attempts to login.
It displays a window with Label, Entry and Button widgets.
The widgets are placed within a frame using grid.
The frame is placed so the widgets appear to be responsive to window resizing, staying centrally aligned.
8.1. Use summary
Enter the correct username and password to see the success message.
8.2. Create the Main Window
Import the messagebox.
Create the main window, and set its title, size, and background color.
import tkinter as tk
from tkinter import messagebox

BG_COLOR = "#333333"


root = tk.Tk()
root.title("Login form")
root.geometry("600x440")
root.configure(bg=BG_COLOR)


root.mainloop()
8.3. Define Constants
Next, define some constants for the GUI. These include background color, font style, and login credentials.
BG_COLOR = "#333333"
FG_COLOR = "#FFFFFF"
FG_BUTTON_COLOR = "#FF3399"
FONT_STYLE = ("Arial", 24)

USERNAME = "johns"
PASSWORD = "123"
8.4. Create the Login Function
Create a function called login() that checks if the entered username and password match the predefined credentials.
If they do, a success message will be displayed; otherwise, an error message will appear.
def login():
    entered_username = username_entry.get()
    entered_password = password_entry.get()
    if entered_username == USERNAME and entered_password == PASSWORD:
        messagebox.showinfo("Login", "Logged in successfully!")
    else:
        messagebox.showerror("Login Error", "Invalid login")
8.5. Create Widgets
Inside the main window, create a frame to hold the widgets.
Then create labels, entry fields, and a login button.
show="*": The show option specifies how the entered characters should be displayed.In this case, it shows an asterisk (*) for each character typed.
This is commonly used for password fields to hide the actual characters.
frame = tk.Frame(root, bg=BG_COLOR)
frame.place(relx=0.5, rely=0.5, anchor='center')  # Centering the frame inside the window

login_label = tk.Label(frame, text="Login", bg=BG_COLOR, fg=FG_BUTTON_COLOR, font=FONT_STYLE)
username_label = tk.Label(frame, text="Username", bg=BG_COLOR, fg=FG_COLOR, font=FONT_STYLE)
password_label = tk.Label(frame, text="Password", bg=BG_COLOR, fg=FG_COLOR, font=FONT_STYLE)
username_entry = tk.Entry(frame, font=FONT_STYLE)
password_entry = tk.Entry(frame, show="*", font=FONT_STYLE)
login_button = tk.Button(frame, text="Login", bg=FG_BUTTON_COLOR,
                            fg=FG_COLOR, font=FONT_STYLE, command=login)
8.6. Arrange Widgets
Use the grid() method to arrange the widgets within the frame.
columnspan=2: This parameter indicates that the widget should span across 2 columns so it occupies both the first and second columns.sticky="news": The sticky parameter determines how the widget should stick to its cell.The value "news" means that the widget should expand to fill the entire cell both horizontally and vertically.
So, the login_label widget is positioned in the first row and spans two columns.
It expands to fill the available space within its cell.
The vertical padding ensures some spacing around the label.
login_label.grid(row=0, column=0, columnspan=2, sticky="news", pady=20)
username_label.grid(row=1, column=0)
password_label.grid(row=2, column=0)
username_entry.grid(row=1, column=1, pady=20)
password_entry.grid(row=2, column=1, pady=20)
login_button.grid(row=3, column=0, columnspan=2, pady=20)
8.7. Full code
# https://www.youtube.com/watch?v=MeMCBdnhvQs&list=PLs3IFJPw3G9KL3huzPS7g-0PCbS7Auc7I&index=5

import tkinter as tk
from tkinter import messagebox

# Constants
BG_COLOR = "#333333"
FG_COLOR = "#FFFFFF"
FG_BUTTON_COLOR = "#FF3399"
FONT_STYLE = ("Arial", 24)
USERNAME = "johns"
PASSWORD = "123"


def login():
    entered_username = username_entry.get()
    entered_password = password_entry.get()
    if entered_username == USERNAME and entered_password == PASSWORD:
        messagebox.showinfo("Login", "Logged in successfully!")
    else:
        messagebox.showerror("Login Error", "Invalid login")


# Create the main window
root = tk.Tk()
root.title("Login form")
root.geometry("600x440")
root.configure(bg=BG_COLOR)

#  create frame widget for other widgets
frame = tk.Frame(bg=BG_COLOR)

#  create widgets in frame
login_label = tk.Label(frame, text="Login", bg=BG_COLOR, fg=FG_BUTTON_COLOR, font=FONT_STYLE)
username_label = tk.Label(frame, text="Username", bg=BG_COLOR, fg=FG_COLOR, font=FONT_STYLE)
password_label = tk.Label(frame, text="Password", bg=BG_COLOR, fg=FG_COLOR, font=FONT_STYLE)
username_entry = tk.Entry(frame, font=FONT_STYLE)
password_entry = tk.Entry(frame, show="*", font=FONT_STYLE)
login_button = tk.Button(frame, text="Login", bg=FG_BUTTON_COLOR,
                            fg=FG_COLOR, font=FONT_STYLE, command=login)


# place widgets in frame
login_label.grid(row=0, column=0, columnspan=2, sticky="news", pady=20)
username_label.grid(row=1, column=0)
password_label.grid(row=2, column=0)
username_entry.grid(row=1, column=1, pady=20)
password_entry.grid(row=2, column=1, pady=20)
login_button.grid(row=3, column=0, columnspan=2, pady=20)

# place frame
frame.pack()


root.mainloop()